
LIQUID MUSIC USER MANUAL
Orientation and Setup
3.1 Nomenclature
The purpose of this guide is to show you how to use every available feature in Liquid Music. Depending on your experience with audio software, some of the language used to describe those features might be unknown. To get the most out of the instructions in the following chapters, please read this chapter. It outlines common lingo and terminology you will find throughout the rest of this book.
3.1.1 macOS and Windows Keyboard Commands Terminology
In the Liquid Music User Manual, keyboard shortcuts will be presented using a combination of modifier keys and keyboard keys.
For your reference and convenience, modifier keys will always be presented in the order of [macOS]/[Win], where [macOS] refers to Apple keyboards and [Win] refers to Windows keyboards.
Note that Apple and Windows keyboards have different names for modifier keys that serve the same function in Liquid Music. All this means is, for example, to copy something on macOS you use the [command]+[C] keyboard shortcut, the same copy command on Windows can be achieved using the [ctrl]+[C] keyboard shortcut. This example would appear in this manual as [command]/[ctrl]+[C]. Similarly functioning modifier keys have been paired accordingly. Modifier Keys are:
- [command]/[ctrl]
- [option]/[alt]
- [shift]
- [control] **macOS only**
3.1.2 Mouse Terminology
- Click: single-click with the left mouse button.
- Double-click: double-click (in rapid succession) with the left mouse button.
- Right-Click: single-click with the right mouse button. Right-clicks typically open pop-up or pull-down menus for that specific clickable object.
- Drag: to click on an object and hold down the mouse button while moving the mouse. To stop the drag from occurring, release the mouse button.
- Drag-and-Drop: to click on an object it, hold the button down while moving the mouse, and releasing the mouse button to complete the action.
3.1.3 Music Terminology
- Note: A unique pitch / frequency. In this manual, you will find the terms note and pitch to be used interchangeably.
- Chord: A harmonic grouping of pitches; see Glossary for more information.
- Scale: A set of pitches; see Glossary for more information.
- Rhythm: A distinct and repetitious pattern heard / played / felt in time; see Glossary for more information.
- Sharps and Flats: Throughout the book, references to sharps will appear as # and flat will appear as b
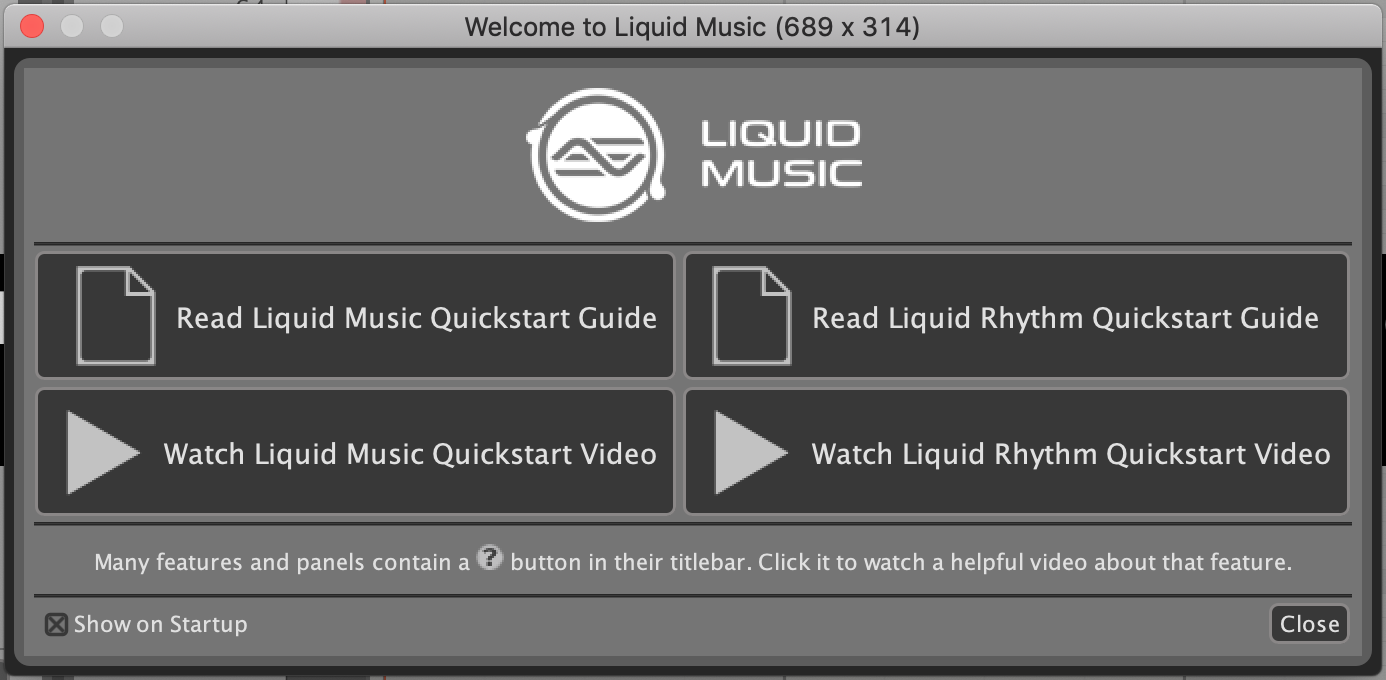
3.2 Welcome Screen
A Welcome Screen greets you when you launch Liquid Music. When you’re new to any software, tools like this provide useful tips and guides; when you’re more familiar with the software, you might want to hide this screen. That’s ok! This window has no feelings, and we totally understand.
- Read Liquid Music Quickstart Guide: Read a brief and informative document featuring some Liquid Music basics.
- Watch Liquid Music Quickstart Video: Watch an informative quickstart video featuring Liquid Music basics.
- Read Liquid Rhythm Quickstart Guide: Reference the Liquid Rhythm quickstart PDF.
- Watch Liquid Rhythm Quickstart Video: Watch an informative quickstart video featuring Liquid Rhythm basics.
- Show on Startup: Check / uncheck this to show or hide this window on startup.
- Close: Make the welcome screen go away.
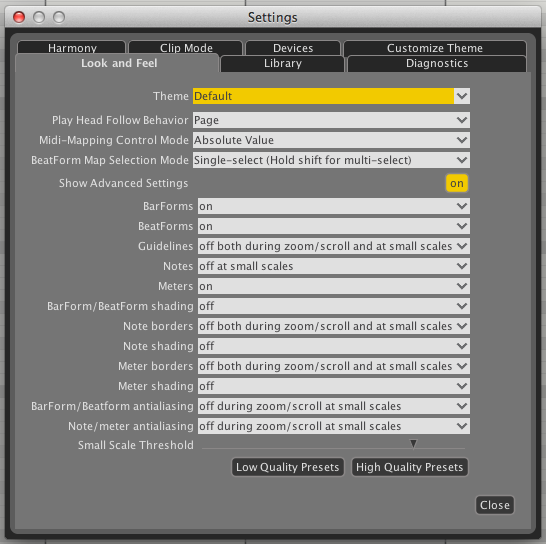
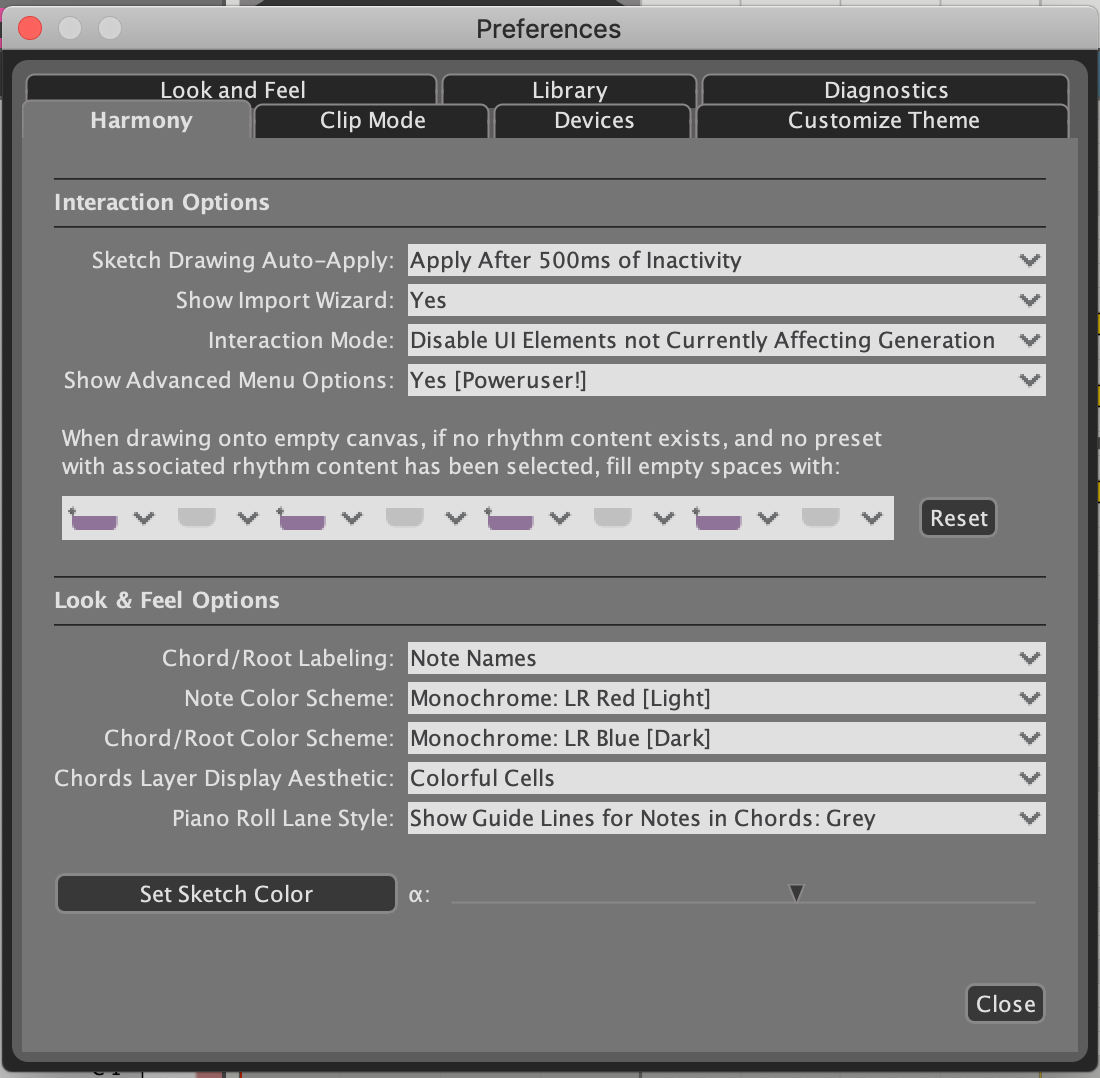
3.3 Settings
The adjustable parameters in the Settings menu are meant to make Liquid Music suit your workflow best. Use the options in the Settings window to configure your sound card, to change the look of a specific UI element, or to customize the feel of the Harmony panel. Access the Settings window by either:
- Using the application menu:
- macOS: in the menubar, go to LiquidHarmony > Preferences …
- Windows: in the application menu, select Help > Preferences …
- Using the [command]/[ctrl]+[,] key command.
3.3.1 Look and Feel
Want to change how Liquid Music looks? No problem. The Look and Feel tab in the setting menu gives you control over a variety of options and parameters.
3.3.2 Library
Assign a path to install the Liquid Music library.
3.3.3 Diagnostics
Turn on diagnostic mode, disable error reports, or activate Alternative Playhead Redraw using the options in this menu.
3.3.4 Harmony
Customize how chords are labeled, what kinds of guidelines appear in the arranger, and an assortment of other parameters.
3.3.5 Clip Mode
A variety of options regarding how the Max for Live plugin behaves.
3.3.6 Devices
A list of the hardware devices connected to your computer and recognized by Liquid Music.
3.4 How to connect a MIDI Device to your computer
There are two ways to connect a MIDI device to your computer:
- Connecting an external MIDI device directly via USB:
- Many new MIDI devices connect to your computer with a USB cable and have their own drivers. Make sure your MIDI device is connected to your computer and recognized by your operating system before launching Liquid Music.
- Connecting an external MIDI device through a MIDI interface:
- Once you’ve connected your MIDI interface, make the following physical connections between your external MIDI device and MIDI interface:
- The MIDI Out on your external device is connected to the MIDI IN on your MIDI interface.
- The MIDI IN on your external device is connected to the MIDI OUT on your MIDI interface.
- Once you’ve connected your MIDI interface, make the following physical connections between your external MIDI device and MIDI interface:
Tip: To ensure you have followed all the necessary steps and installed all the necessary drivers to enable compatibility between your computer and MIDI interface, please reference the MIDI interface manufacturer’s documentation or website.
3.4.1 Testing Your External MIDI Controller
The MIDI Note and Vel indicators to the right of the toolbar will display MIDI values Liquid Music receives from an external device. With your MIDI device connected and turned on, press a key on your MIDI keyboard, drum pad or control surface to test connectivity and monitor it using the indicators.